Vegan Spinach and Mushroom Spaghettini

This is my first vegan pasta ever tried and it tasted really awesome!


I created this recipe before I went vegan, since I am not a cheesy or creamy food person as I think those flavour is too heavy for my liking, I made a lighter version of mushroom pasta without using cream or a lot of oil but still tasted very delicious.


1382895_10208153894905783_8438210201390977671_n


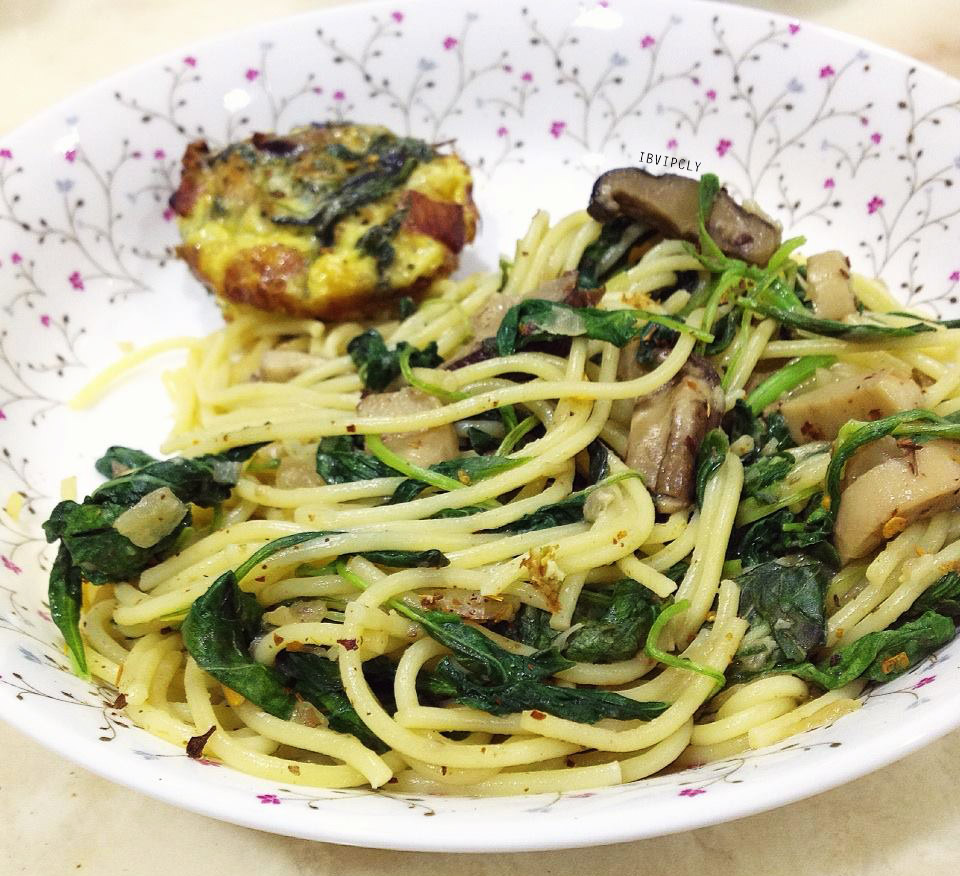
Top left             : Bacon and spinach mini frittata

Top right         : Shrimp scampi aglio olio

Bottom right  : Spinach and mushroom spaghettini


The earthiness and meaty taste of mushroom is the best substitution to meat for people who want to try vegan but miss meat! I don’t know why you want to miss meat tho, veggies are far better taste than meat, you can eat TONS of them without killin’ and harm others and yourselves. 😛

The recipes for the other 2 dishes will be upload soon, but lets focus on the animal-friendly and delicious pasta first! You can swap the spinach to kale or any veggie of your choice, zucchini will be delicious too, you are the boss of your kitchen! 😉


1173818_10208153894825781_7989642776417816844_n


RECIPE (serves 2) :

  • 180g dried spaghettini
  • 1 tbs extra virgin olive oil
  • 3 large or 5 small garlic cloves, finely chopped
  • 200g king oyster mushroom, chopped
  • 3 dried shiitake mushroom, soaked and thinly sliced
  • 3 large handful of spinach, or more if prefer
  • 1/2 tsp dried parsley
  • 1/2 tsp chilli flakes
  • salt n pepper to taste
  • 1/2 cup pasta water
  • more extra virgin olive oil to serve


  1. In a cold pan, add the olive oil and chopped garlic. Turn the heat to medium low and slowly infuse the oil with garlic flavour.
  2. Once the garlic slightly turned golden brown, turn the heat to medium high and add in the mushrooms.
  3. Season with dried parsley, chilli flakes, salt and pepper, continue sauté for 7-9 minutes or until it turned golden brown.
  4. In the mean time, boil the spaghettini in generally salted water for 3 minutes or until al dente.
  5. Add the spinach into the mushroom mixture and cook for few more minutes until it started to wilt down.
  6. Turn the heat off and add the cooked pasta into the pan, add 1/4 cup pasta water and stir everything together until well combined, add more pasta water if needed.
  7. Dish it up on a plate and sprinkle some dried parsley and chilli flakes on top, drizzle with a little of olive oil, serve immediately.


NOTES :

  1. You can choose the type of pasta you prefer or you have on hand, i prefer spaghettini. It is thinner than spaghetti and faster to cook.
  2. Remember not to boil the pasta until fully cooked in the boiling waer as it needs to be cook more in the pan, you never want overcooked mushy pasta to ruin your day or night. Drain it 2-3 minutes before it fully cooked according to the package instruction.
  3. Try to use different variety of mushroom and create a richer mushroom-y taste, I used king oyster as it has a more meaty texture and dried shiitake to richen the mushroom flavour, dried porcini works well too.

Lemon and Herb Chicken Casserole

Sometimes when you don’t have a lot of time to prepare your dinner, casserole is best to make and it is very easy and tasty.


You can prepare all the elements a day before or in the morning under 20 minutes. When you came back from work, assemble everything and pop it into the oven and you will have a hearty dinner for your family.


1455943_10208150217893860_2853263349053919669_n


Lemon is an awesome ingredient when marinading food. The acidity break down the muscle in the protein and make it tender and flavourful. It gives the food a citrusy and refreshing taste, but I recommend you not to put the thin lemon slices on top of the chicken like what I did, it burned and the bitter burnt taste flavoured the chicken and it was very awful.


This dish is packed with protein, carbs and vitamin C. All you need is have a light salad at the side to balance out the meal. You can prepare more and keep leftover in the fridge for tomorrow’s lunch or dinner.


Sweet potato is perfect substitution for potato, it has a sweeter taste and much more health benefits. If you don’t feel like having potato for dinner, omit it and cook some pasta, polenta, or rice is great too.


10666017_10208150217853859_4604738583544328939_n


RECIPE (serve 3-4) :


  • 2 whole chicken leg, 1 half chicken breast *
  • 400g yukon gold potatoes
  • 2 medium red onion


Marinade:

  • 1 whole lemon juice, about 1/4 cup
  • 1 tbs extra virgin olive oil
  • 1 whole lemon zest
  • 1 tsp dried basil
  • 1 tsp dried parsley
  • 1 tsp dried rosemary
  • 1 tsp salt
  • 1 tbs sugar
  • 1/2 tsp black pepper
  • 1/4 tsp chilli flakes


  1. For the marinade, combine everything in a large bowl and set it aside.
  2. Wash your chicken and divide the chicken legs into 2 pieces, mix them into your marinade and let it sit in the fridge at least 4 hours or overnight.
  3. Wash and cut your potatoes into pieces, boil them in salted water for 5-7 minutes or until they are half cooked, drain them well.
  4. Peel and slice the red onion into thick slices.
  5. Put the potatoes and red onion into a glass baking dish, sprinkle 1/2 tsp salt and 1/2 tsp parsley and mix well.
  6. Preheat the oven to 210C or 400F.
  7. Lightly pan sear the marinaded chicken on medium-high heat for 2-3 minutes skin side down, flip it over and continue sear for 30 seconds.
  8. Put the chicken on top of the potatoes and bake in the preheated oven for 30-35 minutes or until the chickens are cooked.


NOTES :

  1. I am using mixture of leg and breast because my parents prefer dark meat and my sister prefer white, you can use legs or breast only too.
  2. I am using these herbs as that’s what I have on hand, if you don’t have any one of them just omit it or add some other herbs that you like.
  3. You can cut your potatoes into your desire size but you need to make sure all the size are almost the same. Boil them from cold water and don’t forger to add salt to your water or the potatoes will taste bland.
  4. You don’t need to sear your chicken if you are using breast only, you don’t want it to be dry like skin of wood.
  5. You can increase the lemon juice for deeper flavour but remember not to marinade it too long as the acidity in the marinade will start to cook your chicken and end up with a mushy meat texture.
  6. You can add variety of veggies (carrots, zucchini, squash, eggplant) to your casserole for a more flavourful and colorful dish.

Banana Muffins

When there are a lot of overripe bananas sitting on your counter and you don’t want to freeze them and make nice cream, oh wait… Who is the silly monkey who don’t like nice cream?!


Anyway, banana is one of the most famous fruits to use in baking. It has a very strong and sweet taste, creamy and gooey texture that many people used to substitute oil and egg when baking.


1474523_10208107007893637_1900973867747054897_n


These banana muffins are perfect for breakfast on-the-go, party potluck, or teatime snack. The cake is moist and have a very strong banana taste yet not too sweet.


You can put some creativity in these by adding different topping to them. Chocolate chips, raisins, peanut butter, nuts, coconut flakes, or make some crumbles on top! The possibility is endless.


535247_10208115984718052_8168426965291291885_n


I doubled the recipe and made 24 for a birthday event. Half of them was with chocolate chips and another half was plain. Poppy seed is not a necessary here, it adds a nice crunch to these muffins. If you cant find it just omit it it will still taste delicious.


RECIPE (12 muffins) :

  • 3 large / 4 small banana, about 2 cups *
  • 1 tsp lemon juice
  • 1 1/2 cup cake flour
  • 1 1/2 tsp baking powder
  • 1/2 tsp baking soda
  • 1/4 tsp salt
  • 2 1/2 tbs poppy seed
  • 1/4 cup oil
  • 1/4 cup brown sugar
  • 3 tbs granulated sugar
  • 1 tsp vanilla
  • 1 large egg
  • 1/4 milk of your choice (I used soy)  *


  1. Preheat the oven to 170C or 350F. Line your muffin pan with 12 muffin liners or spray with non-stick spray.
  2. Mash the banana with fork or potato masher, stir in the lemon juice to prevent from browning, set it aside.
  3. Mix cake flour, baking powder, baking soda, poppy seed and salt together until combined.
  4. In another bowl, add oil, brown sugar, granulated sugar, vanilla, mashed banana and egg. Mix until sugar dissolved and well combined.
  5. Add the dry mixture in 2 batches, stir in gently until just combined, DO NOT overmix or you will activate the gluten and have a rubbery and hard cake.
  6. Add a little of the milk at a time if the batter is too thick, sometimes I need sometimes I don’t. It depends on how ripe your banana is.
  7. Divide the batter evenly into prepared muffin pan, sprinkle some poppy on top (optional) and bake for 20-25 minutes or until toothpick insert comes out clean.
  8. Cool them on the wire rack, serve warm or room temp. Store leftover in a airtight container for not more than 3 days.


NOTES :

  1. Use super ripe banana which the skin is covered with brown spots and very squishy for best results, if your banana is not ripe enough, you may want to add more sugar to suit your taste.
  2. If you want to add topping to them, add after you combined wet and dry ingredients, but remember NOT to overmix this or it will taste awful.
  3. Due to the high ratio of banana in this muffin, the cake is very moist and it does not last long. Best serve on that day or a day after.
  4. Check them frequently to prevent it from overbaked, overbaked banana muffin is really bad.


Mini Plum Tart

This is not my first time making tart but the best one I’ve made so far!


These sweet and tangy tart is perfect to have for teatime. The tart base is shortbread crust, which you don’t have to chill your butter until ice cold, cut them into the flour until small pieces, worry about the butter melts or the room temperature is too warm.


6188_10208107007973639_1241888030435341362_n


Plum is one of my favourite stone fruits and it is very easy to find in my country. You can swap it to peach, apple, apricot, pear, or any fruits that you prefer. The trick here is to slice the plum as thin as possible so it will softened and cooked together with the tart shell in the oven, you will never want to have a piece of uncooked plum in your tart or a overbaked tart shell don’t you?


This shortbread is buttery, crumbly and really delicious. I made them a little too thin so there were a few tarts’ base cracked due to the moisture from the filling. I will suggest you not to make it too thin, learn the lesson from me.


1560606_10208107007813635_6594118614312439496_n


They are tiny, cute and super delicious, I am craving these goodies while typing this post haha. Maybe they will appear in my kitchen very soon! 😉


RECIPE (makes 18-20) :

Shortbread:

  • 110g butter, softened
  • 3 tbs granulated sugar
  • 1 egg
  • 1/2 tsp vanilla
  • 1/2 tsp salt
  • 250g flour
  • Coarse sugar for sprinkling


Filling:

  • 3 large plums, cored and thinly sliced
  • 3 tbs powdered sugar
  • 1/4 tsp salt
  • 1 tbs lemon juice
  • 1 1/2 tbs corn starch


  1. Mix the sliced plums, powdered sugar, salt and lemon juice in a bowl, set it aside for 5 minutes. Add the corn starch and mix until well combined. Keep in the fridge for later use.
  2. In another bowl, cream together butter and sugar until light and fluffy.
  3. Add the egg and vanilla into the butter mixture, whisk until smooth.
  4. sift in the flour and salt, stir until everything is well combined.
  5. Roll the dough into a log shape, wrap it using a piece of cling wrap and chill it in the fridge for at least 1 hour or 20 minutes in freezer.
  6. Preheat the oven to 200C or 400F.
  7.  Take the chilled dough out from the fridge and slice it into 18 pieces, press each of them into 3 inch mini tart pan.
  8. Arrange the plums onto the tart shell, spoon about 1/2 tbs juice collected in the bowl into each tart, bake for 18-20 minutes or until tart shell turned golden and the filling is bubbling hot.
  9. Cool them for 20 minutes, take them out from the tart pan and let them cool completely on wire rack.  Sprinkle a small pinch of coarse sugar on top of each tart for some nice crunch and sweetness.
  10. Keep them in the fridge for at least 2 hours and serve them cold. Store the leftover in fridge for up to 5 days.


NOTES :

  1. Try to use plum that is very ripe, soft and juicy, the riper the plum the sweeter and tastier it will be at the end results.
  2. Corn starch is used to act as thickening agent in this recipe, you can use corn flour if that is what you have on hand, but it will look a little cloudy.
  3. For all the lovely vegans, simply swap the butter to vegan butter and the egg to flax egg, it will work perfectly fine.
  4. You can serve them warm but the filling will be a little runny, chill them in the fridge allows the flavour to settle down and and the filling to set, but warm or cold it will still taste delicious.
  5. The sprinkling of sugar is optional, I just love how it makes the fillings look shiny.

Vegan Oatmeal Raisin Cookie

I believe a chewy and soft oatmeal raisin cookie is many people’s childhood memories.


Growing up in an Asian family, cookie is not the thing that we often eat. But childhood favourite or not, these are no doubt super delicious and amazing!


1098048_10208100794378303_2229081325690335393_n


It is very hard to find vegan cookie in my country , so making them myself is the best way to satisfy my cookie craving. Nothing fancy here, just pure homemade goodness.


This recipe is very simple, you can make these with your kids and have fun. All you need is just 1 bowl, spatula and whisk, that’s it.


These cookies have the perfect ratio of oats and raisins, buttery, right amount of sweetness, slightly crispy on the outside, soft and chewy on the inside. They are perfect to fill up your cookie jar!


10380284_10208107167337623_3281999296299563868_n


RECIPE (makes 9 large / 18 small) :

  • 90g vegan butter, softened
  • 1/4 cup sugar
  • 1/3 cup brown sugar
  • 1 tsp vanilla
  • 1 flax egg
  • 2/3 cup flour
  • 1 tsp baking powder
  • 1/2 tsp baking soda
  • 1/2 tsp salt
  • 1 1/4 cup rolled oats
  • 1 cup raisins


  1. Preheat the oven to 170C or 350F. Spray a cookie tray with non-stick spray and set it aside.
  2. In a large bowl, cream together butter, whi and brown sugar until light and fluffy.
  3. Add the vanilla and flax egg, Mix until smooth.
  4. Mix the flour, baking powder, baking soda and salt into the wet ingredients, stir until everything nice and combined.
  5. Stir in the rolled oats and raisin until evenly distributed into the cookie dough.
  6. Cover the bowl with cling wrap and put into the fridge to chill for at least 30 minutes or 10 minutes in the freezer.
  7. Scoop the cookie dough onto the tray you prepared earlier, leave 1 inch between the cookies.
  8. Bake for 12-14 minutes or until the edges of the cookies turned golden and firm to touch but middle is still soft.
  9. Cool the cookies on the tray for 10 minutes, transfer them onto wire rack to complete the cooling process. Store them in a airtight container for up to 1 week.


NOTES :

  1. You can swap the raisin to cranberries, blackcurrant, sultanas or other dried fruits that you prefer.
  2. I find cooling the cookie dough in the fridge settled down all the flavour and it taste better, you can skip this step if you want.
  3. These cookies don’t spread at all during baking time, you may want to press them down using a spoon or wet finger for even baking.
  4. The cookie dough freeze very well, just wrap the leftovers in a piece of cling wrap and stick into the freezer. Take them out 30 minutes before you want to bake them again.

Pandan Gula Melaka Roll

Gula Melaka and pandan leaves are one of my favourite ingredients when comes to baking.


Since I was a child, my grandpa always buy a pandan chiffon cake for me and sister to have for snack. It is no doubt my all time favourite flavour. Pandan as known as screwpine has a unique smell and flavour that often used in Asian cuisines. From sweet to savoury, desserts to rice dishes. It usually featured in recipes that included coconut milk, Nasi Lemak (coconut rice), curries, kaya (coconut jam), kuih talam, you named it!


12360282_10208060839899466_7239890944855800578_n


Gula Melaka a.k.a coconut palm sugar is made by extracting sap from budding flower of coconut. It has a very dark brown hue and fragrant, rich and slightly smoky taste. A good Gula Melaka does not taste sweet at all like processed sugar, it brings a very caramel-y coconut fragrance to your food.

This recipe is a truly Malaysian’s favourite, the unique pale green and fragrance from pandan extract, caramel-y coconut punch from gula melaka, soft and fluffy texture of the sponge, sweet and rich taste from the kaya.


This cake does not need any raising agent, you just need to whip the egg white until stiff peaks and glossy, all the tiny air bubbles in the whites will help to make this cake super soft and light.


12391826_10208060838579433_6805241898614428226_n


I didn’t make the kaya jam myself as my fridge had some leftover that need to be used up asap, but I will definitely encourage you to make it, it will be much more yummier if using homemade kaya. I have not make them once so far, but you can try Sonia’s Pandan Kaya Jam recipe if you feel like making it yourselves, she is a amazing homebaker! 🙂


8295_10208105428094143_5702551090947301651_n

RECIPE :

A:

  • 4 egg yolks
  • 50g gula melaka
  • 20g oil
  • 1 tsp vanilla
  • 1 1/2 tbs pandan extract *
  • 90g coconut milk *
  • 100g cake flour
  • 1/4 tsp fine salt

B:

  • 4 egg whites
  • 30g granulated sugar

C:

  • 1/2 cup kaya jam *


  1. Preheat the oven to 200C or 400F. Line the bottom and sides of a 9×13 inch baking pan with parchment paper.
  2. Beat egg yolk and gula melaka until light and foamy.
  3. Add oil, vanilla, pandan extract and coconut milk, mix until well combined.
  4. Sift and fold in cake flour and salt into the egg yolk batter until smooth, set it aside.
  5. In a clean bowl, whisk egg white until foamy, add sugar slowly and continue beating until stiff peaks formed and look shiny.
  6. Fold the meringue gently  into the egg yolks in 3 batches until the batter looks light and fluffy.
  7. Pour the batter into your prepared pan, bake for 14-17 minutes or until the cake puffed up and toothpick insert comes out clean.
  8. Immediately unmould the cake once you take it out from the oven, pull off the paper from 4 sides to prevent cake from shrinking.
  9. Leave it cool completely on the wire rack, tear off the parchment paper and spread a good amount of kaya jam on your cake, roll it up carefully.
  10. Use a piece of cling wrap to wrap the cake roll tightly but don’t squish the cake, keep it in the fridge for about 1 hour to set. Cut into slices and serve. Store the leftover in the fridge for not more than 3 days.


NOTES :

  1. I made my own pandan extract since I have a pandan plant at my front yard, simply blend 5 large / 8 small pandan leaves with some water in a blender, squeeze out all the pandan juice and store it in the fridge overnight, you will see it separated into 2 layers of liquid, the bottom part which is dark green in colour is the pandan extract you need to use. If you can’t find fresh pandan leaves, store bought is fine but it won’t be fragrant as fresh.
  2. I used soy milk because I don’t have coconut milk on hand, but I will recommend you to use coconut milk because it will be much more delicious and aromatic compared to soy milk.
  3. The amount of kaya jam is depends on your own preferences, if the kaya jam is on the sweeter side I will recommend you to use lesser. Mine was super sweet so I only spread a thin layer on it.
  4. For easier rolling, use a knife and slice a few horizontal lines on the side that you want to spread your jam on, do not slice all the way to the bottom until it divided into 2 pieces, just about 1/3 of the height will do.

Marble Yoghurt Cupcakes

Yoghurt was one of my favourite snack before I became a vegan.


My fridge always have a big tub of yoghurt sitting and waiting for me to eat it. Although i love to eat it, I often can’t finish the whole tub before it turned bad.


I have been thinking some ways to help and use up the leftover yoghurt that I can’t finish, and what is the better way to use it than adding them into your bakes?


8767_10208060840779488_1839299028072811756_n


These babies cupcakes is so cute and each of them have their own unique swirl pattern. They are low fat, low sugar, much healthier for you body than normal marble cake that contains tons of butter! Yoghurt is a perfect substitution for fats like oil or butter.


The texture are slightly different compared with normal marble cupcakes. It has a chewier texture and less crumbly, if this is not the cake you like, don’t bake things with yoghurt.


You can veganize this recipe, simply swap the butter to vegan butter, yoghurt to coconut yoghurt or soy yoghurt, and egg to flax egg, it will work perfectly fine.


12391169_10208100794338302_5070422618808164724_n


I glazed them with syrup when they just came out from the oven to add some moisture and sweetness to them, if you don’t want to you can skip this step, but I will definitely recommend you to do it, why you don’t want to make a already delicious cupcake even better?!


RECIPE (makes 12) :

  • 1 1/2 cup cake flour
  • 1 1/2 tsp baking powder
  • 1/2 tsp baking soda
  • 1/4 tsp fine salt
  • 70g butter
  • 1/2 cup sugar
  • 1 egg
  • 105g yoghurt
  • 3/4 cup milk (I used soy)
  • 1 1/2 tsp vanilla
  • 1/4 cup unsweetened cocoa powder
  • 2 tbs hot water


Espresso Syrup :

  • 1 tsp espresso
  • 1/4 cup water
  • 2 tbs powdered sugar


  1. Preheat the oven to 180C or 370F. Line your muffin pan with 12 paper liners or spray with non-stick spray.
  2. Mix the cocoa powder and hot water together to form a cocoa paste, set it aside for later use.
  3. In a clean bowl, cream together butter and sugar until light and fluffy.
  4. Crack the egg in and beat until combined.
  5. whisk yoghurt, milk and vanilla into the batter.
  6. In another bowl, combine cake flour, baking powder, baking soda and salt together.
  7. Stir the dry into wet in 2 batches until just combined.
  8. Divide the batter into 2 portion, add the cocoa paste into one of the batter until well combined.
  9. Spoon about 1 tbs vanilla batter to the cupcake liners, follow by 1 tbs of chocolate batter, repeat the process until all the batter is used up and each cupcake is 3/4 full.
  10. Swirl each cupcake using a toothpick until beautiful pattern formed, do not overdo this step or you won’t get a marble cake but normal chocolate cake.
  11. Bake for 22-25 minutes or until toothpick insert comes out clean.
  12. Poke few holes and glaze the cupcakes with coffee glaze while they are still hot, cool them on the cooling rack until cooled.
  13. Store them in an airtight container for not more than 4 days in room temp.


NOTES :

  1. You can bake this into a cake instead of a cupcake. Simply pour the batters alternatively into a 8 inch pan and swirl it, bake for 28-32 minutes or until toothpick insert comes out clean.
  2. If you don’t have cake flour on hand, all purpose flour is fine. You can make your own cake flour too, measure 1 cup of all purpose flour, scoop out 2 tbs and replace with 2 tbs corn flour, your homemade cake flour is done!
  3. The yoghurt I used is plain natural yoghurt, you can use greek yoghurt too if that is what you have on hand.

Vegan Triple Chocolate Zucchini Brownie

Who can tell there are zucchini in these decadent delicious brownie? NO ONE.


Brownie has been a lot of people’s favourite, comfort food but not for me. To be honest, I don’t like chocolate. I don’t hate them, just don’t like the taste of it. I may be the weirdest girl in the world who doesn’t eat chocolate, but I love my zucchini. 😛


1455889_10208097535536834_6584604984695284100_n


They are super moist due to the addition of zucchini in this recipe, and the texture for this brownie is slightly between cakey and fudgy brownie. If you love fudgy brownie, simply under bake them for few minutes.


The triple chocolate included unsweetened cocoa powder, chocolate chips and chocolate hazelnut spread. You can use nutella if that is what you have on hand (I used nutella as I won’t be eating this), but fyi nutella is NOT vegan.


Applesauce is used to reduce the amount of oil in these brownies, you can swap all the oil to applesauce but the texture will be different. Oiless dessert never taste delicious as with oil, but you are the boss of your bakes.


1014461_10208060838619434_5458527698889259802_n


The chocolate hazelnut spread adds a beautiful swirl on the brownie, you can swap it with peanut butter, almond butter, or just omit it. Double chocolate brownie sounds great too. 😉


RECIPE (makes 18 large / 24 small) :

  • 1 cup all purpose flour
  • 3/4 cup cake flour *
  • 3/4 cup unsweetened cocoa powder
  • 2 tsp baking soda
  • 1/4 tsp salt
  • 1/4 cup oil
  • 1/4 cup applesauce *
  • 1/2 cup sugar
  • 1/4 cup brown sugar
  • 1 flax egg *
  • 1/2 tbs vanilla
  • 1/2 tsp instant espresso *
  • 2 1/4 cups zucchini, peeled and shredded
  • 1/2 cup chocolate chips
  • 3 tbs chocolate hazelnut spread


  1. Preheat the oven to 180C or 375F. Grease an 9×13 inch baking pan with oil and coat with cocoa powder, set it aside.
  2. Mix 2 tbs flour from the recipe with the chocolate chips in a small bowl, set it aside for later use.
  3. Mix together remaining flour, cake flour, cocoa powder, baking soda, and salt together in a large bowl.
  4. In another bowl, combine oil, applesauce, white and brown sugar, flax egg, vanilla, instant espresso and zucchini together, whisk until everything well combined.
  5. Pour the dry into the wet in 2 batches, gently stir until just combined.
  6. Fold in the chocolate chips gently, DO NOT overmix the batter.
  7. Pour the batter into the baking pan you prepared earlier, spread the batter out by using spatula until as even as possible.
  8. Drop the chocolate hazelnut spread evenly on top of your batter, swirl it into the batter by using a toothpick or wooden skewer. I simply just draw it up and down.
  9. Bake for 20-24 minutes or until toothpick insert comes out clean, for fudgy brownie, take it out from the oven 2 minutes before it fully cooked.
  10. Cool the brownie in the pan until completely cooled, slice into individual piece and serve. Store leftover in a airtight container for not more than 5 days in room temp.


NOTES :

  1. Cake flour is used to make the texture slightly lighter, you can use only all purpose flour if you don’t have any.
  2. Applesauce I used is unsweetened, you can use store bought or homemade like me. Simply peel, cored and diced 2 small apples into small pieces (the smaller the faster it cooks), put them into a sauce pan and add 1/2 cup water, boil until softened, about 10-15 minutes. Mash them with a potato masher or fork until it became puree. Keep leftover in fridge for up to 1 week.
  3. Flax egg is just combine 1 tbs flax meal and 3 tbs water, keep it in the fridge for at least 10 minutes or until it thicken and have egg-like texture. You can use egg too if you are not vegan.
  4. Instant espresso is optional but it enhances the flavour of cocoa, you can omit it if you don’t have any.
  5. Batter will be very thick and that is perfectly OKAY, the zucchini will release a lot of moisture during baking time which makes this brownie so moist and delicious.

Vegan Chocolate Cupcakes

These vegan chocolate cupcakes tasted just as delicious as normal’s, or better!


I may not look like one, but I am a vegan since this year August. This lifestyle changed me completely and it is super amazing! You will feel healthier, more relax and happier. Not only saving the lives of innocent animals, but also saving your health, saving the Earth, saving the environment.


People always question me, why I still bake with eggs when I am a vegan? Well, I can’t force my family not to eat eggs right? Living in an Asian family, it is very hard to omit meat, egg and dairy in our meals, as long as I am the one who don’t eat these, it is fine to me. No stress, no fuss, only happiness.


10398555_10208095610648713_1046287760055620049_n


Back to these cupcakes, they have the perfect moist, soft and crumbly texture which is just amazingly perfect! Due to the high ratio of cocoa powder in this recipe, it looks dark and have rich and intense chocolate taste, so eating one is more than enough to satisfy your chocolate craving, of course eating two is not a bad thing. 😛


1474483_10208095610608712_8089521381420349296_n


Soaking them with coffee syrup won’t make them taste like coffee, but it enhance and richen the chocolate flavour. I have baked these several times, it is perfect for party, birthday or just keep it at home.


This recipe is super simple and easy to make, just 1 bowl dry and 1 bowl wet, combine together and bake! The trick is to add BOILING water at the end to make these cakes super moist and delicious, NEVER overmix them or you will get a rubbery and hard cakes that taste super awful.


5342_10208060834859340_5111476314996297811_n


You can coat them in ganache, pipe buttercream on top to make them look more like a cupcake,or just have them as it, they taste delicious plain too. I coated mine with vegan chocolate ganache and decorated with chocolate chips, colour sprinkles and timtam’s peanut butter (not vegan!) I bought from Melbourne for my friend’s birthday surprise and glad she loves it!


RECIPE (12 cupcakes) :

  • 1 cup cake flour
  • 1/2 cup unsweetened cocoa powder
  • 1/4 cup sugar
  • 1/4 cup brown sugar
  • 1 tsp baking powder
  • 1/2 tsp baking soda
  • 1/4 tsp fine salt
  • 1/2 tsp instant espresso *
  • 1/2 cup plant-based milk (I used soy)
  • 1/4 cup oil
  • 1 flax egg *
  • 1 tsp vanilla
  • 1/2 cup boiling water


Coffee Glaze :

  • 1/2 tsp instant espresso
  • 1/4 tsp vanilla (optional)
  • 2 tbs powdered sugar
  • 1/4 cup hot water


  1. Preheat the oven to 170C or 375F. Line your muffin pan with 12 muffin liners or spray with non-stick spray.
  2. For the coffee glaze, mix all the ingredients in a small bowl and set it aside for later use.
  3. Combine remaining cake flour, cocoa powder, sugar, baking powder, baking soda, salt and instant espresso in a bowl, set it aside.
  4. In another bowl, combine milk, oil, flax egg and vanilla together.
  5. Pour your wet ingredients into the dry, mix until just combined.
  6. Slowing add the boiling water, whisk the batter while you adding the water, beat for 2 more minutes to add air into your batter.
  7. Divide the batter into 12 cupcake liners, bake for 12-15 minutes or until toothpick insert comes out clean.
  8. Poke the cupcakes with a few holes using toothpick, brush each with the coffee glaze until all the glaze is used.
  9. Put the cupcakes on a cooling rack until completely cool. Store them in a airtight container to prevent it from drying out.


NOTES :

  1. Addition of instant espresso enhance the taste and flavour of cocoa, you can omit it if you don’t have any.
  2. Mix 1 tbs of flax meal with 3 tbs of water in a bowl, put it in the fridge for at least 10 minutes for it to thicken, it acts like a binder in the cake just like real egg. You can use real egg too but it won’t be vegan.
  3. To make flax meal, simply grind flax seed in a grinder until finely ground. You can grind a big batch and store them in cabinet for future use.
  4. To make vegan chocolate ganache, mix 1/2 cup vegan chocolate chips with 3-4 tbs of plant-based milk (I used soy) in a microwave-safe bowl, pop them in the microwave for 30-40 seconds until melted, glaze it on top of a cooled cupcake and let it cool and set.

Lemon Chiffon Cake

When life gives you a lemon, make lemon chiffon cake!


Citrus flavour cakes are not my cup of tea, but they are one of my favourite food haha. It has a very lemony and refreshing flavour from the natural oil of zest and juice but it doesn’t taste sour at all.


12366261_10208094968872669_8290601329294220036_n


I may not have the most perfect unmoulding skill to unmould a chiffon cake from pan, as you can see the uneven colour of the top and crack everywhere, but as long as the taste is good so I am fine with it.


I love to make chiffon cake because first, it is much more healthier than pound cake and butter cake, contains lower fats and sugar. Second, it is super soft and fluffy you won’t feel heavy or guilty after eating 2, 3 or 4 pieces in one go!


Some people may prefer a more chewable texture for their chiffon cake, some prefer melt-in-your-mouth texture, this can be adjust by adjusting the amount of cake flour in your recipe. For a chewier cake, increase the cake flour to 100g, or reduce for the other option.


12366405_10208094968752666_983133852458088200_n


The photo above is used 100g cake flour, so it is fimer and able to stand after divided into 4. Look at all the zest spreading over the cake, you can imaging how lemony and fragrant it is!

11138522_10208094968712665_266144466499890679_n5218_10208094968832668_7001954678247804174_n


RECIPE (serves 12) :

A:

  • 5 egg yolks
  • 10g granulated sugar
  • 30g flavourless oil
  • 1/8 tsp fine salt
  • 60g freshly squeezed lemon juice *
  • 20g milk
  • zest of 1 medium lemon
  • 1 tsp vanilla
  • 80g cake flour (I used 100g) *

B:

  • 5 egg whites
  • 70g granulated sugar


  1. Preheat you oven to 170C or 300F.
  2. Whisk egg yolks with sugar until fluffy and light.
  3. Add oil, salt, vanilla, lemon juice, milk and zest into the egg yolk, mix until combined.
  4. Sift in cake flour in 2 batches, mix gently until combined, set it aside.
  5. In another clean bowl, beat egg whites until big bubbles formed.
  6. Add the sugar in 3 batches, beat until stiff peaks form and looks shiny.
  7. Fold the egg whites into yolk batter in 3 batches as gently as possible to minimize losing the air you beat into the whites.
  8. Pour the batter into a 8 inch chiffon pan, about 10cm high away from your pan to remove big air pockets in the batter.
  9. Bake for 43-47 minutes or until skewer inserted comes out clean.
  10. Quickly flip the pan over once took out from the oven and hang it upside down to cool completely.


NOTES :

  1. If you are afraid the cake will taste too sour for your liking, simply add more sugar or reduce the lemon juice to 50g and increase the milk to 30g, as long as the total liquid is 80g it will be fine.
  2. for a firmer texture of chiffon cake, use 100g cake flour or 80g if you prefer a super soft and melt-in-your-mouth texture.